Removing the Inside Screen
1. This window comes in four basic designs:
-
The vent portion of the window slides up, called a vertical slider
-
Half of the window slides to the side, call a horizontal slider
-
The vent is located on the lower corner of the window, call a T-Bar slider
-
The stationary window which does not have a screen or vent, call a picture window.
Each of these windows requires slightly different procedures to remove both the screen and vent portion of the glass. All glass and screen in these windows can be replaced without removing the entire window from the RV.
2. Removing Vertical Slider Screen
To remove the screen on the VERTICAL SLIDER the glass vent must first be removed. This is accomplished by first removing two rubber stops (one on each side) located at the upper most end of the vinyl vent track.
-
After removing the stops, slide the window out and out of the track. Next move the vent to the side until it clears the u-channel of the frame and pull the vent clear
-
The screen is held in place by the vent. Once the vent has been removed simply lift the screen up and out of its track just as you removed the vent glass.
3. Removing Horizontal Screen
To remove the screen on the HORIZONTAL SLIDER close the screen and use the hooked tool to lift the bottom end of the track farthest form the screen up enough to pull it out with your hand.
-
After the back screen track has been removed, open the screen as far as it will go and remove the second (front) section of track with the hooked tool.
-
The screen will then drop to the bottom of the lower track clearing the upper groove. Pull the upper end of the screen frame toward you and lift it out of the lower track.
4. Removing the T-Bar Slider and Vent
Both the screen and sliding vent are held in place by a total of four vinyl tracks each. Two of the tracks are on top and the other two on the bottom. To remove the screen:
-
Use the hooked track remover.
-
Hook the bottom end section of the screen track farthest fro the screen and lift the track from its groove.
-
Pull this section out. Do the same thing to the top section.
-
After the two tracks have been removed, us the hook to remove the rubber stop in the sliding glass track.
-
Open both the window and screen as far as possible.
-
Using the handle of the hooked tool or a flat end screw driver slide the remaining bottom track as far as possible toward the corner of the window frame where the rubber window stop was located.
-
Slide the screen back to its original position.
-
Remove the last section of vinyl track with the hooked tool.
-
The screen will now drop into the groove enough to permit removal of the screen by pulling the top toward you so it clears the upper track when lifter out of the lower track.
The sliding vent glass is removed in much the same fashion. Remove the screen, and open the vent glass as far as possible. Remove the front section of the bottom track. Close the window and remove the rear bottom track.
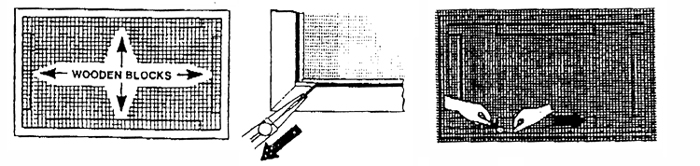
5. Replacing the Inside Screen
-
On a table or board, nail 1/4" x 1" blocks of wood against the inside of each of the screen's four sides. This will keep the screen frame square during screen replacement. Be sure the groove is facing upward.
-
Remove the spline from its groove by using a pair of needle-nose pliers. The spline can be easily pulled free after the first several inches have been removed from the groove. After removing the spline, lift the screen from the spline groove. After removing the spline, lift the screen from the spline groove.
6. Re-Screening
-
Cut the fiberglass screen slightly larger than the overall size of the screen frame. Place the screen over the frame and the screen spline on top of the screen about the spline groove
-
Force the spline and screen into the groove, while keeping the screen taut in the direction you are working. Trim the excess screen with a sharp knife or razor blade.